Showing posts with label Tutorial. Show all posts

Thursday, December 27, 2018

Windows Can't be Installed on Drive 0 Partition 4(Solved for HP Laptop)

I was in deep trouble while setup windows 10 on my HP Laptop. I searched and searched google but find no solution. Lastly I discovered that the issue is inside the boot difference between MBR(Master Boot Record) and GTP(GUID Partition Table).
MBR for BIOS(Legacy) boot mode and GTP for UEFI boot mode.
So I need to bootable my pendrive in MBR mode. So that It can install windows with support Legacy boot mode.
I download Rufus and bootable my pendrive. The settings are given below:

  1. Open Rufus
  2. From 'Boot Selection' 'Select' your ISO file
  3. Partition scheme change to MBR mode
  4. File System change to NTFS
  5. START
That's it. 

Photo Credit: Rufus
Then I insert the pendrive in my HP laptop and restart my laptop and press F9(Boot Device Option)
I select USB Device Flash Drive (Not UEFI mode) and Press Enter. 
Vowla!!! My windows installation problem has gone. 


Friday, August 17, 2018

Making a 360 video in Blender 3D and upload it on youtube


It’s really fun and easy to make a 360 video in blender and upload it in youtube.
You just need to follow some steps to do that.
  1. Make any animation on blender Cycles render. (I assume you know blender very well)
  2. Put the camera middle of the scene and keep it selected.
  3. In editor panel click the camera icon and keep the settings as below image.
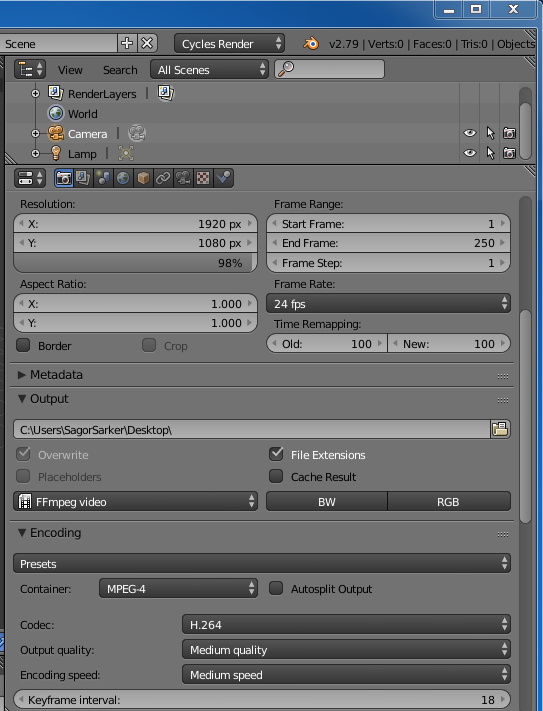
4. That’s it. and go to render settings and keep the settings as below image
Here frame range will be your frame range and also about the resolution.
5. Just render it and keep the output file inside a folder.
6. Now download the metadata injector from this link . As I am windows user I have downloaded the windows version.
7. Open the metadata injector and select the video you made. Keep the settings as Spherical and save it.
8. Now upload it on youtube and wait for confirmation. Youtube will take sometimes for processing.
That’s all. Thanks for reading and being with me.

Monday, June 11, 2018

How I am using my symphony roar e80 as emulator

I have an android phone called symphony android mobile. I have tried many ways to use this phone as emulator. But failed.
Finally I have solved my problem.
Here is the step I used:

  1. First I connect my android phone as usb on my computer and turn on usb debugging.
  2. Then I go to computer>manage>device manager>other devices
  3. There I saw my android phone is looking un-usable. 
  4. So, I download the driver from internet.
    Download Link: https://gsmusbdriver.com/symphony-e80
  5. Now I unzip this file on my desktop. 
  6. Then again I go to computer>manage>device manager>other devices
    Click one by one and doing the same work for all the un-usable version of my device.
    work: first right click on android adb interface>update driver software>browse my computer for software>Let me pick from a list from my device>android device>have disk>browse>android win_usb.inf>>install
  7. I have done the same work for all the version of my devices and now my works as emulator.

Wednesday, November 22, 2017

Checking internet connection and showing result in Snackbar in android studio

Using Snackbar you need to add android support design dependencies. Copy below dependencies and add to your build.gradle file.


compile 'com.android.support:design:25.3.1'

Give an id to your layout. as I am using RelativeLayout so I give it an id like 'mylayout'

android:id="@+id/mylayout"

In MainActivity.java file inside onCreate() method added your layout id like

Tuesday, October 17, 2017

Making a complete game asset in Blender

Some steps need to be followed to make a game asset in blender.
I am describing these steps as below


  1. Creating Model: Creating Model is the first step of making game assets. You should give concentrate which types of game asset are you want to make. Low poly or high poly. If you want to make low poly game assets then use simple mess and try to avoid sub-division. But try to give details of your model. 
  2. Mark Seam: This is the interesting part. Before uv unwrapping you should mark your seam. That means differ your model part to paint to add texture. It's easy to mark seam in blender.
    first select any edge and press CLT+E and then mark seam. After marking your seam the edge will be turn red. 
  3. UV Unwrapping: Another interesting part is UV Unwrapping. After marking your seam select face mode and select whole the model by pressing A. and Then press U and select Unwrap .
    It's done. and in UV image editing you can see your uv map. then select UV>export UV layout and save that as PNG format. 
  4. Painting or Texturing:  After getting the PNG Image you can open this image on any image editor and paint it with your favorite color and save it. This is your texture. you can use this texture in blender. 
  5. Exporting as FBX: Export the whole file as fbx format and use it any of the game engine. 

Monday, August 28, 2017

Android Swipe Refresh


This article is about android swipe refresh with simple code.
To add Swipe Refresh we need to add android SwipeRefreshLayout widget under activity_main.xml file


Inside SwipeRefreshLayout we need to put our refresh widget such as ListView,TextView


Saturday, August 26, 2017

Interstitial Ads for Android


Today We are going to learn how to set interstitial Ads for android.
Our Steps of work describe below.


Creating An Android Project

Open your android studio and under File>New>New Project and name your Interstitial Demo. Press next and keep as it is and press next select Empty Activity. Then press next and then finish.

Monday, August 21, 2017

গিট(About git) সম্পর্কে একটু (For Windows)


গিটঃ 
git হচ্ছে ভার্সন কন্ট্রোল সিস্টেম। মানে ধরুন আপনি জাভাতে কোন প্রজেক্ট করছেন। ধরলাম আপনি জাভাতে একটি ক্যালকুলেটর তৈরি করছেন। আপনি সময়ে সময়ে সেই প্রজেক্টে সম্পাদন করবেন মানে নতুন কোন ফিচার যোগ করবেন কিংবা আগের কোন  কোডের সাথে আরো কিছু যুক্ত করবেন। এই যে মোডিফাই বা সম্পাদনা করলেন সেটা করতে গেলে আপনার প্রধান প্রজেক্টের আগের ভার্সনে কি ছিলো সেটা থাকবে না। বলতে গেলে থাকবে। কিন্তু বার বার আপনাকে আপনার প্রজেক্টটি কপি করতে হবে। সেই কপি ভার্সনে ইডিট করতে হবে। এটা অনেক ঝামেলার ব্যাপার। এই ঝামেলা থেকে বাঁচার জন্যেই ভার্সন কন্ট্রোল সিস্টেম বা গিটের আবির্ভাব। গিটে শুধু commit করলেই আপনার পুরনো ভার্সন তো থাকবেই , সাথে যতবার সম্পাদনা করবেন তার সব ভার্সনই থাকবে। এবং কী কী পরিবর্তন করেছেন সেটাও আপনাকে বুঝিয়ে দিবে। তো চলুন শিখি গিট সম্পর্কে।

Wednesday, August 16, 2017

How I added AdMob in my android applications(Banner Ads)


Image Download From google image search


1. First of all I modify build.gradle file. There under dependencies I added a code of line.
 2. Then I added another code of line under res/values/string


Friday, May 12, 2017

মৌলিক উৎপাদক(Prime Factor)

মৌলিক উৎপাদক হলো কোন একটি সংখ্যাকে উৎপাদকে বিশ্লেষণ করলে বা ভাঙ্গতে থাকলে শেষে যে মৌলিক সংখ্যার তালিকা পাওয়া যায় সেগুলো।
যেমন ঃ ১২ সংখ্যাটির মৌলিক উৎপাদক হলোঃ ২, ২, ৩
এখানে, ১২ = ২*৬
               =  ২*২*৩
একইভাবে ৩১৫ সংখ্যাটির মৌলিক উৎপাদক হলোঃ ৩,৩,৫,৭
৩১৫ = ৩*১০৫
        = ৩*৩*৩৫
        = ৩*৩*৫*৭
এখন জাভাতে কীভাবে একটি নির্দিষ্ট সংখ্যার মৌলিক উৎপাদক বের করা যায় তা আলোচনা করবোঃ

Thursday, March 16, 2017

Building Vertex Group Particle System in Blender

First of all we need to take a plane and sub-divide it in several time.

Tuesday, January 3, 2017

অ্যান্ড্রয়েড এর জন্য একটি সিম্পল ব্রাউজার তৈরি করা


অ্যান্ড্রয়েড এর ওয়েব ভিউ ফিচারের একটি সহজ টিউটরিয়াল হলো কিভাবে একটি সিম্পল ওয়েব ব্রাউজার তৈরি করবেন।
সেটি করার জন্য প্রথমেই আপনাকে একটি নতুন প্রজেক্ট নিতে হবে।
ধরি , আমাদের সেই প্রজেক্টটির নাম Simple Browser

Sunday, July 12, 2015

বাইনারি ট্রি

আজকে অসাধারন একটা বিষয় পড়লাম । সেটা হচ্ছে বাইনারি ট্রি। সত্যি বলতে বাইনারি ট্রি বলতে ভালো কিছু আমি কিছুক্ষন আগে  পর্যন্ত জানতাম না। যাক, কিছুটা যখন ধারনা হল সেটা শেয়ার করি।
এটি পড়তে গিয়ে আমি যে প্রশ্নগুলোর সম্মুখীন হয়েছি সেগুলো হল
প্রশ্ন ১ঃ ট্রি কী?
উত্তরঃ সরল চক্র ছাড়া যে কোন সংযুক্ত গ্রাফকেই ট্রি বলে। ট্রি হচ্ছে অনির্দিষ্ট গ্রাফ যার যে কোন দুইটি ভারটিক্স একই পাথ(path) এ অবস্থিত।

Recent Post